Web Developer
#1 Figma Plugin to Import design to Bubble.io
 Leer en
Español
Leer en
Español Leia em
Português
Leia em
PortuguêsIn the ever-evolving world of web development, the bridge between design and functionality is crucial. The "Figma to Bubble" plugin emerges as a game-changer, transforming this bridge into a superhighway. This plugin not only streamlines the workflow but also brings a new level of efficiency and precision to your design-to-development processes.
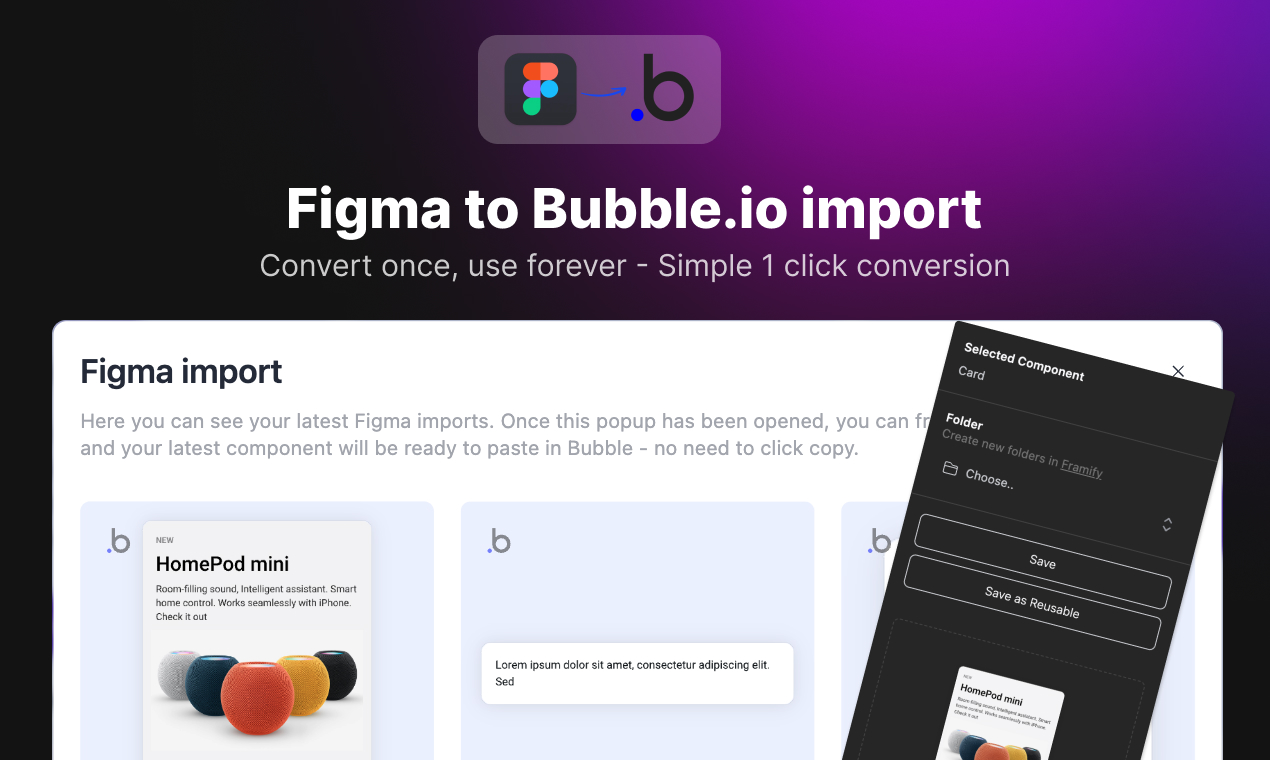
Key Features of the Figma to Bubble Plugin
Component Conversion
The magic begins with the plugin’s ability to convert your intricate Figma designs into functional Bubble components. Whether you’re crafting a simple UI element or an entire page layout, the plugin seamlessly translates your designs into Bubble’s format. This feature is a boon for developers aiming to maintain design integrity while speeding up the development process.
Color Variable Integration
Color consistency is vital in branding and UI design. Our plugin recognizes this by allowing you to match Figma colors with Bubble's color variables. This flexibility means you can maintain brand consistency effortlessly across your designs and final products.
Organizational Capabilities
Organization is key in any project. The plugin supports this by enabling you to categorize and store your converted components in specific folders within Framify. This feature makes it easy to manage and retrieve your designs, enhancing your workflow efficiency.
Max Width Setting for Large Components
When dealing with larger components like hero sections, the plugin allows you to set a maximum width. This ensures that your design adapts gracefully to different screen sizes, maintaining its aesthetic appeal and functionality across devices.
Naming Conventions for Efficiency
Naming conventions are more than just labels. They are a roadmap for your plugin to understand and convert designs accurately. Using specific names like :IMAGE:, :POPUP:, :INPUT:, :DROPDOWN:, and :RG: in Figma ensures that the plugin recognizes and converts these elements correctly.

Direct Pasting to Bubble’s Clipboard
The convenience doesn’t stop at conversion. Once you save a component with our plugin, it can be directly pasted into Bubble’s editor if you have the "Figma to Bubble" menu open in our Chrome Extension. This feature not only saves time but also streamlines the integration of your designs into the Bubble platform. This means, once you hit save, you can hit "Paste" straight away in Bubble.
Best Practices for Designing with the Plugin
- Embrace Auto-Layout: For the best results, it's crucial to build your Figma designs using auto-layout. This ensures that the plugin can accurately interpret and convert your designs into Bubble-friendly components.
- Handling Images: Unlike other elements, images from Figma won’t be exported automatically. You’ll need to export them manually later using Figma. This step is crucial for maintaining the visual quality and alignment of your design.
Use Cases and Examples
1. Building a Responsive Web Application
- Scenario: You're tasked with creating a responsive web interface for a new SaaS product. You've designed a sleek UI in Figma with various elements like navigation bars, dropdown menus, and user input forms.
- How the Plugin Helps: The Figma to Bubble plugin converts these elements into Bubble components, preserving the responsive design set in Figma. The
:DROPDOWN:and:INPUT:tags, for instance, ensure your forms and menus are functional and interactive in Bubble.
2. Redesigning an E-commerce Website
- Scenario: Your e-commerce platform needs a refresh. You've created a new layout in Figma with a focus on product galleries and detailed product pages.
- How the Plugin Helps: Use the
:IMAGE:and:RG:(Repeating Group) tags in Figma to signal image galleries and product lists. The plugin translates these into Bubble, facilitating an easy update of your site's product display sections.
3. Launching a Marketing Landing Page
- Scenario: You're launching a marketing campaign and need a landing page. Your design in Figma includes a hero section, testimonials, and a call-to-action (CTA) section.
- How the Plugin Helps: With the max-width settings, your hero section scales perfectly across devices. The plugin also recognizes text blocks and buttons, ensuring your CTAs and testimonials are accurately replicated in Bubble.
Troubleshooting Common Issues
1. Alignment and Layout Issues
- Problem: After conversion, some elements might not align as they did in Figma.
- Solution: Ensure that your Figma design uses auto-layout effectively. Check the parent-child relationships in your Figma layers to make sure they translate well into Bubble’s structure. Sometimes, minor manual adjustments in Bubble are necessary to perfect the layout.
2. Color Mismatches
- Problem: The colors in Bubble do not match your Figma design.
- Solution: If you want to use Bubble Color Variables, then verify that the color variables in Bubble correspond to your Figma colors. Use the plugin's color mapping feature to align Figma colors with Bubble’s color variables. Ensure that color opacity is also correctly set in Figma.
3. Responsive Design Challenges
- Problem: Components look perfect in Figma but don't respond well in Bubble.
- Solution: Utilize Bubble’s responsive settings to fine-tune your design. Check if elements in Figma are marked correctly with tags like
:RG:for responsive behaviors and that you are using auto-layout in Figma. Remember, responsive design in Bubble may require additional tweaking beyond the plugin's conversion.
4. Image Export Issues
- Problem: Images from Figma are not automatically exported to Bubble.
- Solution: Manually export images from Figma and upload them to Bubble. Remember that the plugin uses placeholders for images, and the actual images need to be managed separately.
5. Missing or Incorrect Components
- Problem: Some components are missing or not correctly rendered in Bubble after using the plugin.
- Solution: Double-check your naming conventions in Figma. Make sure that each component is tagged correctly (e.g.,
:IMAGE:,:POPUP:) for the plugin to recognize and convert them accurately. If issues persist, contact us via support@framify.io.
6. Icons, Logos don't look right
- Problem: Some logos or images turned into multiple icons.
- Solution: Double-check your naming conventions in Figma. Make sure that each component is tagged correctly with
:IMAGE:tag for the plugin to recognize and convert them accurately. If issues persist, contact us via support@framify.io.
By understanding these common issues and their solutions, you can greatly enhance your experience with the Figma to Bubble plugin. Remember, while the plugin significantly streamlines the design-to-code process, a certain level of manual adjustment and familiarization with both Figma and Bubble platforms will always be instrumental in achieving the best results.
Element namings
To optimize the conversion process and ensure accurate recognition of your design elements, we have implemented a system of specific naming conventions. By using these designated names, you can guide our system to better understand and translate your Figma designs into Bubble components.
Specific Names for Better Detection
Here are the tags you can use to label your elements effectively:
- :INPUT: Use this tag for individual input fields.
- :DROPDOWN: For dropdown menus or selection boxes.
- :MULTILINE: Ideal for multiline text input areas.
- :RG: Represents Repeating Groups in your design.
- :POPUP: Use this tag to denote pop-up elements.
- :IMAGE: Assign this tag to SVGs that represent "image".
- :FLOATING: use this for Floating Group elements.
Applying the Naming Conventions
Using these namings is straightforward and enhances the outcome of the conversion process. By correctly tagging your elements, you can ensure they are accurately transformed into the corresponding Bubble components. Here's how to use them:
-
Vector Drawings: Tagging a vector drawing or an SVG with
:IMAGE:ensures it’s recognized as an image element during conversion. This is crucial for elements like icons, logos, or any graphic that should be treated as an image. -
Inputs and Dropdowns: When you label an input field in Figma with
:INPUT:or a dropdown menu with:DROPDOWN:, our system automatically converts these to their respective Bubble input types. This ensures that your text boxes and selection menus retain their intended functionality. -
Creating Repeating Groups: For repeating elements like lists or grids, use the
:RG:tag. It’s important to include only one item (the template for repeated content) inside the container tagged with:RG:. This tells our system how to structure repeating groups in Bubble, preserving the design and layout you’ve crafted in Figma.
Remember, correct tagging is key to a smooth and successful conversion process. It not only saves time but also ensures that your design intentions are accurately reflected in the final Bubble application. So, take a moment to review your Figma designs and apply these tags where appropriate – it will make a significant difference in your workflow!
Conclusion
The "Figma to Bubble" plugin is not just a tool; it’s a catalyst for efficiency and precision in web development. It respects your design's integrity while ensuring a smooth transition into Bubble’s robust platform. Whether you're a solo developer or part of a large team, this plugin is designed to make your workflow seamless and enjoyable.